Sunday, April 26, 2009

Angela's ATC cards


Ugh. At least that's what I was thinking as the deadline to send my ATCs to the Lucky 13 meeting (see post below) drew near. I had to call Cheryl to have her remind me what the requirements were. As it happens, I was sitting on the floor of my craft room when I called her and I had Earth Day on my mind (my family started a new tradition of eating in the park and using no electricity for the evening) so as I chatted with Cheryl, I started working on my ATC cards using some of the "I can't bear to throw it away even though I can't think of what to do with it" materials I had lying within reach. The results are these crazy bubble wrap ATC cards that I decorated with the gorgeous orange mesh our oranges and grapefruits come in. I think they're fun, my husband declared them ugly. It seems so wasteful to package fruit this way but I am fascinated by the color and texture of the mesh. No one loves man-made materials like I do. In high school, I promised my friends that if I ever had twin girls, I would absolutely name them Polly and Esther in honor of the fabulous man made fabric... Then I found out that the mother of Dear Abby and her equally famous, advice-giving twin, Ann Landers, had beaten me to the idea. But I digress. Happy Earth Day!

april 25th

a few of us were able to meet up for a day - yesterday. here's a group shot of cheryl, jennifer, elena, melanie and candice.


per tradition... here's smooshy face with mel, cheryl and elena.


we had a ton of fun. ate some yummy food. blazing buffalo chicken dip, velvet cupcakes, veggies, homemade mac and cheese - yum. we cropped. we gabbed. we laughed. we swapped. atc swap that is. here are some pics of those atcs.


Friday, April 24, 2009

A page for Cheryl....

I want to say thank you to all the ladies in this awesome group who were patient with me. I was really kinda bewildered by how to best do this. I just wanted to do a good job. I love the pictures Cheryl sent me off CHA. They made me smile and had all these wonderful smiles in them . I am happy with what came out. I only used fabric and no paper. I included the words CHA in cool plastic letters
I made a little packet in the back so that she could hold any memorabilia from CHA 2009. I had fun and now I am off to play catch up....Gloria King 

Wednesday, April 22, 2009

True Beauties by Jolee Jane

Layout by Jolee Jane for Melissa Kennedy

The moment I saw this picture of Melissa's beautiful daughter' with their contagious smiles

I knew I had to create a little whimsy

After painting the canvas I drew on the scalloped top border with a black oil pastel crayon and then re- emphasized the scallops with more white paint

I decided to hand sew some felt triangles and while making them realized they would make roofs(very random thought;) , the house bodies are card stock covered in Mica.

Lastly I made a journal tag that tucks in just behind the photo.

always so very fun to create with such beauty for inspiration!

Monday, April 20, 2009

For Jane by Angela Daniels


When Jane sent me this fabulous photo of the Hotel Monaco in Portland, Oregon and the gorgeous photos of her with her daughter, they all looked so... I don't know... so fashion forward. The circumstance of their trip tells a very different story but I just couldn't stop thinking about a fashion inspired page (Project Runway addict that I am) and the story boards that designers use. To tell the fashion story on the front side of the canvas, I dipped into my jar of black and white ribbons and used some of my favorites to create a fabric-like border for the photos and another black ribbon with an interesting border to highlight the middle photo of Jane and her daughter at the bottom of the layout. In keeping with that design board idea (and again trying so hard to get that fabulous textural look so many of my fellow "Luckies" excel at), I used pins and tulle for an accent.

Because I was thinking about fabric swatches (these little canvas books really do make me think more about sewing on layouts than I usually do) and because I was still concerned that Jane's story about her trip be told, I decided to use some of my favorite fabric swatches to make a very rustic pocket on the back of the layout. Jane can use this pocket to add memorabilia and journaling notes later and the pocket will still fit in with the designer board idea I began with on the front of the layout. One thing I love about scrapping is that a completely inept seamstress like me can pretend to be a bit of a fashion designer with a few scraps and fabric- a pocket of mine wouldn't hold up well to wear but for a little canvas book? I think it will do just fine.

Sunday, April 19, 2009

Cover Page by Cheryl Waters

I am just so thrilled to be here . . . in this circle journal group . . . amongst new and old friends. In the last few months I've been touched by continuing to cultivate established friendships and thrilled to begin new relationships with these wonderful and talented women. I'm just so excited about what each of our circle journals will look like when they are completed in January of 2010. Each one will be so unique and represent 12 (there are 13 of us) unique and special artists and ladies.
I am so excited about the pages these artists are creating that I went ahead and created a cover page the other night for my journal. Behind this page I've created will house a representation of friendship, art, investment (into one another's lives), beauty and so much more.
This journey is such a gift! A gift of friendship, art, life, and sharing. I'm thankful you all are here and sharing it with us!
So I just thought I'd share my cover page.


I'm not one that uses red that often but it was fun to do a red and black combination in honor of the theme we've picked . . . the Lucky Thirteen. The #2 card represents my Fiskateer number #002. I see this cover page as a home awaiting some beautifully created pieces of art. I can't wait.

Pages by Melissa Kennedy

Gi’day lovely ladies. i think it would be fair for you to think that the chick from downunder had gone MIA. For those of you who work fulltime you will understand never ending work commitments – make that work in the scrapping industry, and sometimes the last thing you feel like doing when you get home is just that. i then had an appointment with a tent for a week which i must say was soooooo much fun – followed by a massive overdose on chocolate. Anyway the long awaited start to this project finally happened and i must say i have had so most fun over this weekend. Thank you thank you thank you for asking me to be a part of this. Ok my pages are a little simpler than some of the awesome work i see showing up here but this canvas thing is all sooooo new to me – so i am learning as i go and hope you like.

What to do – what to do….Well with the canvases, i tackled this weekend, i first cut them to size ( 8 x 9”), frayed the edges and gave the backs of them a quick coat of fabric stiffener – did we have to do that?????? not sure but i did anyway – it all kinda made me look as it i new what i was doing. LOL. Didn’t have the colored paint i wanted on hand so i thought i would try out some techniques with ink and masks. This was fun. Flourishes, spots and dots being rubbed onto the canvas – i had ink all over me and trust me when i say more than one photo had to be reprinted due to dirty fingers…. hmmmmm.
Add to that some stitching and rubons........ Can you believe that???? the rubons worked like a treat on the canvas. i weren’t sure at first whether to try them or not but glad i did and loved how they turned out.

February Layout – Michelle Van Etten’s photos
Michelle sent me these of her and a friend partying – she said the two of them are known as fire and ice so with fire in my mind i went for the oranges and reds. Had a little play in photoshop to color up the hat to match and had lots of fun creating this layout.
March Layout – Stephanie Ackerman’s photos
Stephanie sent photos of a trip on Valentines day to Grandpa and grandma’s house
Being valentines day it gave me an excuse to use up some of the “hearts” i have stashed away. You've got some gorgeous “boys” there Stephanie
April Layout - Melanie Christie’s photos
Melanie sent me in some photos of some of her birthday celebrations.
Had a bit of fun with this layout too with the little party hat and cake.
Sounds like the cooking class was a fantastic surprise.

Saturday, April 18, 2009

Lucky Green for Melissa

Designed by Jennifer Priest
Photographs by Melissa Kennedy


I'm catching up on my Lucky 13 pages--woohoo! I created this page for Melissa. She sent me photos from the dinner we had at CHA Winter 2009--we all met up at the Paradise Pier hotel by Disneyland to have dinner & chat in person. Our next date is January 2010! WOW it seems far away but then again, I cannot believe it is April already--January will be here before we know it!

Melissa's favorite color is green (and I love it too) so it was fun to create this page on the "lucky" theme with all sorts of green and lucky embellies. This page also helped me a tad bit with my green flower dilemma--trying to figure out what to do with all the green flowers that come in multi-packs of paper flowers. Use them as flowers! Duh?! he...he...he....


I'm not an art expert but I have found that I love mixing colors that are next to each other in the rainbow (or color wheel if you prefer). Yellow pages look awesome with a little bit of orange. Orange makes a red page POP! A little purple makes a moodier blue page, and a little bit of blue, makes a green page prettier. So on this page I worked in a little bit of blue.

Since we are using canvas for this project I figured I'd do a little sewing. Just like doodling, if you draw/stitch more than one line, any boo-boos or waves will be disguised--it will look like you planned it that way. I stitched around the edge of the canvas using turquoise thread, about 6 times all the way around. For more details about how I made this page, please check out my blog.

Thanks for looking and happy creating!

Friday, April 17, 2009

A Page by Cheryl Waters

Designed by Cheryl Waters
Photographs by Jolee Jane Pollock

I thoroughly enjoyed working with Jolee Jane's photos . . . she attended the Art Nest and shared with me she thoroughly enjoyed the creative journey. She shared that she learned new techniques and expanded her artistic horizons. I loved her painting she created . . . oh so beautiful. I made a little mini book on the canvas page to include her photos and a couple pages to record her creative journey. I used a smaller scale photo for the book but got a 4x6 printed and cut it up and used bits and pieces of it to embellish the page. I also used gesso, paint, and Tattered Angels Glimmer Mist (on the page itself and to antique the white girls gloves). I found this bird cage pendant that I thought was perfect to go with the theme. Jolee Jane, thanks for sharing what you learned with us 'Lucky 13' and for allowing me to scrap your fun photos. I'll leave you with a stamp I found that I thought was so appropriate . . . "Of course you can fly, for dreams have wings." ~ Anon.


Thursday, April 16, 2009

A Page By Angela Daniels

designed by angela daniels
Candice McLean & friend Nicole


I know, I know. This layout has been a long time coming. Let me just assure you, my being tardy in this particular instance isn't due strictly to a predilection for procrastination. I mean, it's not as if I was sucked into a 2 month-long "Real Housewives" special or something (I wish). The stark fact is, I am intimidated to be part of the Lucky 13. Just a bit. I mean just look at the 2 lovely layouts already posted for February. They're so, I don't know, 3D and with so many pretty goodies to look at. As much as I love shopping for scrapbook embellishment (and who doesn't?), I just can't make them work for me. I'm a simple scrapper through and through although I'm hoping to learn from these "Luckies" each month and maybe, just maybe, get brave and try new techniques. I also reserve the right to continue to tweak any layouts I post (we don't exchange them with each other until next year, after all). Who knows? Maybe by the time I hand this to Candice in person, it will be so deliciously piled high with colorful goodness, she won't even be able to squeeze her album shut. It could happen...


P.S. You see I couldn't resist a detail shot anyway, though. Still, I DID use dimensional glue dots to pop up an enlargement of Candice and her friend Nicole. I just felt like they really needed to look like they were jumping off the page- I love that these grown women are jumping on the trampoline- definitely people after my own heart. And then I panicked when I saw Cheryl's lovely layout of my photos with all the dimension so I added on this little K&Co brad. It's a start.

My Lucky ATCs


We have a crop coming up and the Lucky 13 designers are doing an ATC swap. Here are mine. I used a slide mount and wrapped it with chenille stems, then used a mini cupcake wrapper to make a little flower, added the black silk flower and a big flatback pearl. I covered chipboard swirls and crowns with black paint and glitter flakes. All stacked on a playing card with the word "lucky" I do feel lucky to be a part of this group! I made an extra so leave a comment on this post and I will pick a winner on Monday and send you one!


Wednesday, April 8, 2009

Miami Nitelife...

(Page by Jennifer Priest for Michelle Van Etten)

I had a blast working with Michelle's photos of her Miami visit with friends. She gave me such sassy pictures that match her sassy personality and with the Miami high roller theme, I had to get some bling onto the page.

I treated the entire canvas with Glimmer Mist and then a little paint (step by step is on my blog). I recently diecut a palm leaf from some patterned paper so Iused the negative space as a stencil and inked several palm leaves onto one side of the page. I used Krylon 18kt Gold Leaf pen to write "Miami" and to draw some highlights on the palm leaves. The gold pulls from the colors in Michelle's pics.


Some of the more intricate Prima flowers can be ripped apart in the middle, creating one large flower and one smaller flower. I did that to a Prima Flower and adhered it the page. Then I cut about 2 yards of crepe paper in half lengthwise with pinking sheers. I gathered the crepe paper into a rosette with a running stitch down one side - I'll share this technique another day:). I layered the rosette on top of the larger Prima flower.


Everyone has been covering buttons with fabric, crepe paper, and all kinds of fun things so I thought I would try it. I covered a button with ribbon and then stitched it into the center of that large flower.

I Glimmer Misted some Tim Holtz Grungeboard Letters for the "NiteLife" title. GM works great on "naked" chipboard!


A couple more pieces of yellow rhinestones from my stash and finished!

About those covered buttons...

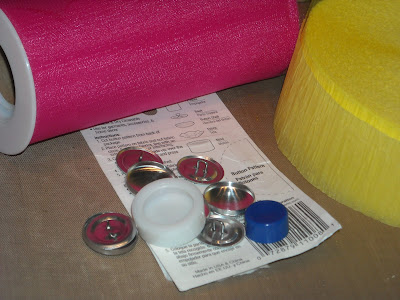
You can get them at any crafts store and sometimes even at garage sales and thrift stors. They come in a little kit for under $3 and in all different sizes. They don't look like much in the package but you can cover them with anything to make them spectacular -- if you can bend it, you can cover the button with it. Think fabric, felt, paper, crepe paper, tulle, canvas...

To get started you'll need the button kit, scissors, and some material to cover the button with. Here I am using yellow crepe paper and some pink tulle.

Set up the button tool (pretty simple, just put it on the table).

The layer you want on top you'll need to lay down first. I wanted the tulle on top so I put that down first:

Then put down the next layer (if any). If you're using just fabric, then you can skip this step. Since crepe paper is thin, I used four layers of it.

After you have you fabric laid out, press the button into the tool.

This is what it should look like after you have pressed the button into the tool:


You can trim the excess fabric away with some scissors but leave enough to be tucked into the back of the button, about 1/4" all the way around.


Stuff all the excess fabric that is hanging over the edges into the back of the button - make sure you catch all the edges otherwise they will poke out on the front:


Press the button back into the button tool , using the blue part of the tool to press it in all the way.


To get the button out, press on the bottom of the tool until the button pops out (ignore my inky, glimmer misted fingers - hehe).


Here's what the finished product looks like:


Until next time, Happy Creating!